Oekaki guide
Revision as of 19:17, 29 October 2011 by Vampiric (talk | contribs) (Created page with "== Getting your Oekaki working == Welcome to the in-depth guide to the Chickensmoothie Oekaki; The tools, functions, basic use, rules and explanations. ;What is the Oekaki? Ho...")
Getting your Oekaki working
Welcome to the in-depth guide to the Chickensmoothie Oekaki; The tools, functions, basic use, rules and explanations.
- What is the Oekaki? How does it work? What is Java?
- The Oekaki on Chickensmoothie is a Java-based drawing application called Chibi Paint. On this you can draw and post a variety of pictures and doodles for other users to see! To begin however, there are some things you might not know or understand about the Oekaki, and when you first load it it looks a bit complicated and daunting! Never fear, this guide will run you through just about every single tool and option on here so you know what you can use and what it does.
- You will need to ensure you have the most recent version of Java correctly and fully installed on your comptuer to use the Oekaki. If you are having issues loading, or the image blanks out, or your Java is not up to date, it is reccommended that you uninstall / reinstall it fully and restart your browser.
- If you are still having issues, please use the text search in the Suggestions and Problems forum for the word 'java' and you will be able to find all the help responses concerning these issues that have been mentioned thus far.
- The Java Website, where you can download / update: Click me to get Java!
Getting to know your tools
| Now that we have this accomplished we can begin your oekaki! It's always ideal for your first drawing to either start in Beginners or in Sketches and Experiments, as indicated by the colourful arrows below. |

| Once you are in the area you will draw in, press this button here to begin a new drawing on a blank canvas. The next thing that will load is a blank drawing space with various boxes scattered around. I have outlined each of these areas with a different colour to help guide you through what they are and what you can do with them below. |  thumb |

Here is a list of the sections by colour I will use to define and name them by for ease of distinction.
You can also click Read by them to go to that particular explanation ~- Oekaki Menu
- Oekaki Tools
- Canvas Options
- Line Style Box
- Colour Palette
- Colour Drop Box
- Textures Menu
- Brush Options
- Layers Box
- Canvas
Oekaki Menu
- This is the menu for the entire Java application of Chibi Paint that you just loaded. Let's run through briefly what is under each section of this menu and what it does. Most of this is self explanitory and if you wish, you can skip this explanation and go to the next step where we learn about your tools.
- File:
- Save Oekaki: Performs a save of your current image and presents you with options after saving. This does the same as Save Pic located on the Canvas Options toolbar.
- Edit:
- Undo: Undoes the last action or stroke you did on the drawing. Control+Z is the shortcut on your keyboard for this.
- Redo: Remakes an action or stroke you may have just undone. Control + Shift + Z is the shortcut on your keyboard for this.
- Clear History: NOT USEFUL. It is not reccomended to press this, as it will clear all previous remembered actions and you will not be able to undo them.
- Cut: Cuts out an area you have selected with the marquee on the Oekaki Tools box and removes it from view.
- Copy: Copies an area you have selected with the marquee on the Oekaki Tools box and remembers it.
- Copy Merged: Creates a merged selected image of ALL the layers within your marquee and remembers it.
- Paste: Creates a new layer with the most recent Copy, Cut or Copy Merged image you have created using the above options and pastes the selection onto it.
- Select All: Selects the entire canvas space for you.
- Deselect: Removes your selection box tool, no matter where you have selected.
- Layers:
- Duplicate: Creates an identical copy of the layer you are currently on, and pastes the copy on a new layer above the current one. This will also add the word 'Copy' to the layer name of your duplicate.
- Merge Down: Merges the layer you are currently on with the one below it, combining them into one whole layer. The layer name retained will be that of the lower layer.
- Merge All Layers: As you can imagine, merges every layer on your Layers Box into just one layer.
- Effects:
- Clear: Clears everything on the current layer. Can also be done with the Delete key on your keyboard.
- Fill: Will fill either your marquee selected area, or your entire current layer (if nothing is selected) with the colour you have selected on your Colour Palette.
- Flip Horizontal: Will flip only your current layer horizontally. (Left<=>Right)
- Flip Vertical: Will flip only your current layer vertically. (Up <=>Down)
- Invert: Inverts everything on your current layer to the opposing colour on the pallette. In example, black to white, red to aqua, etc.
- Blur: Blurs the current marquee selection, or entire layer (if nothing is selected) by a set amount (Blur Amount), and a set amount of times (Iterations).
- Noise: Creates a Noise image of your current marquee selection or currently layer.
- View:
- Floating Mode: Launches your Chibi Paint application in a Floating window above your webpage. This is incredibly useful if you are experiencing scroll related issues, or want to expand your space to work with. If you use this, DO NOT leave the page you came from on your internet browser or you will lose your work. You must always save your image and close the floating box if you want to move around the forum again on the page you came from.
- Zoom In: Zooms closer into your canvas image. This is the same as the zoom in button on the Canvas Options.
- Zoom Out: Zooms further away from your canvas image. This is the same as the zoom out button on the Canvas Options.
- Zoom 100%: Returns your view to the original canvas size so you can see everything as it will be seen when your save and post your work.
- Use Linear Interpolation: A very complex term and a not very useful tool for most people. It looks at the zoomed in version of your drawing, smoothes out harsh edges, and displays them in a 'constant' state which does not distort the image when scrolling in and out. It will not affect the finished drawing and overall it's not really helpful. I reccommend just avoiding it to save confusion.
- Show Grid: Displays a grid over the top of your canvas which can aid some users into correct propotioning or perspective. Overall not that useful for general doodling.
- Grid Options: Displays the size option for the grid.
- Palettes: A very handly option. If you accidentally close or lose one of your tool boxes, in example: Layers Box, you can re-open it. Here you can also toggle on and off all your tool boxes that are available. if you press Toggle Palettes, it will make all your tools viewable/unviewable.
- Help:
- About: Provides a popup box with all the information about the Chibi Paint application and version, about the editing done to the application, and distribution licenses and links. You will probably look at this once and then never again!
Oekaki Tools
This box loads to the left of your workspace. It has a variety of useful tools with which to draw and colour. Below I have written out their names next to their icons, and I will explain what they do. Most of them are very self explanatory, however.

- Marquee:
- This is a selection box tool that allows you to grab certain areas of your canvas in order to manipulate them, in example; to copy them, erase them, or cut them out. To use this tool, left click+hold your mouse button to one corner of what you want to select, and drag the box shape you see around the specific area or part you want to highlight. Let go of your left mouse button when it is all within the box and you will see a dotted-line box around your selection. This is now your Marquee'd area that you can copy, cut, duplicate or fill.
- Move Tool:
- For moving around things you have drawn on a layer. You can only move what is on your currently selected layer. You can also use the move tool together with the Marquee tool to move only a selected area around.
- Flood Fill:
- For filling in a specific area or layer with one select colour. Pick your colour with the Colour Palette, select the Flood Fill tool and click on the canvas to fill your layer. Alternatively, you can use your Marquee to select one area, and fill inside of it after selecting it.
- Rotate Canvas:
- This is used for rotating your canvas freely to different angles so that you can draw at whatever angle you like. This is helpful if you plan on drawing something hanging upside down, in example. To rotate, left-click hold and move your mouse to move the canvas. No matter what angle you draw at, however, all saved oekakis will be posted at the same horizontal position you started at, which is important to remember for when you post. Double-clicking on the Rotate Canvas icon will set your canvas back to its original position.
- Pencil:
- This tool does literally work like a pencil. When creating lines and colouring you will notice the difference from the pen tool. It is a lot sharper and it doesnt blend the way the pen tool does when working with opacity. If you scribble back and forth on one spot, it will not get darker until you let go of your left mouse button and begin again over the same spot. You can get a realistic pencil feel using this tool.
- Pen:
- Exactly like a pen, it has slightly smoother edges and is usually nicer for making lineart. If you continuously draw in one stroke (not letting your mouse button go) with a low opacity, it will continue blending over and getting darker, like a real pen would do to paper.
- Airbrush:
- Works like a real airbrush, creating a spray effect that's useful for blending, shading and highlighting. Useful for softly shaded effects rather than sharp, harsh definite shadowing.
- Watercolour:
- As if you had a wet brush to paint, this tool blends your colours on your layer in a watery fashion, smoothing them together to combine and make new shades. Can be one way of shading and building up tones when colouring in.
- Eraser:
- A sharp-edged eraser that will 'rub out' whatever you run it across. Very useful for fixing any size mistake! Handy for cleaning up colour that is outside of your lineart.
- Soft Eraser:
- Softer-edged than the previous eraser, this is a little more useful for gently cleaning up edges which are too harsh/pixellated, or for removing small areas of colour gently by repeatedly rubbing over a spot on your canvas.
- Smudge:
- For literally 'pushing' your colours about on the canvas, smudging them together. Very useful for creating certain textures in backgrounds or for pushing around the edges to soften them up.
- Blender:
- Self explanatory, it blends together colours on your canvas to create new shades and textures.
- Dodge:
- A simple tool for bringing lighter areas to your coloured drawing. It can however be very harsh and you may want to move the Brush Options around to how you want it. Useful for creating harsh lighting effects and light flares.
- Burn:
- The opposite to Dodge. This brings darker areas to your colouring. Can create a sense of 3D-ness when used together with the Dodge tool.
- Blur:
- For creating an out-of-focus look to your drawings, by altering the Brush Options you can slightly fuzz your lines and colours and blur them. Sometimes useful for things in the background of your pictures when your focus is on the front.
- Colour Picker:
- For selecting a colour that already exists on your image should you need to use it again. Simply select the Colour Picker, hover your mouse over the colour and click. You can also select colours without this tool by right-clicking on any colour you wish to re-use again.
Canvas Options

All of these buttons are quick-click options to most of the functions you can find on the Oekaki Menu along the top. These will be a lot faster for you to use when you are working. It is also useful for doing critical saves during your work.
- Zoom In:
- Zooms closer into your canvas image. This is the same as the zoom in button on the Oekaki Menu.
- Zoom Out:
- Zooms further away from your canvas image. This is the same as the zoom out button on the Oekaki Menu.
- Zoom 100%:
- Returns your view to the original canvas size so you can see everything as it will be seen when your save and post your work.
- Undo:
- Undoes the last action or stroke you did on the drawing. Control+Z is the shortcut on your keyboard for this.
- Redo:
- Remakes an action or stroke you may have just undone. Control + Shift + Z is the shortcut on your keyboard for this.
- Save Pic:
- Saves your picture and gives you some posting options. This is the same as pressing File > Save Oekaki on the Oekaki Menu.
If you select this Save Pic option on a new drawing, you will get the folowing options:
- Yes, post it now:
- Posts the picture as it currently is, and takes you to posting mode where you can add a title and a small post about it.
- No, keep drawing:
- Saves the picture to the oekaki, but does not post it. You can carry on drawing knowing you have saved the picture in that state incase something happens to your internet browser/connection.
- No, i'll finish it later:
- Saves the picture, and takes you back to the oekaki forum you came from, but does not post your picture, you can then continue your picture later by going back to where you were, clicking 'New Drawing' and selecting the image you were working from by looking below the blank image. See picture right.
If you come back later and decide you no longer want to continue that picture and want to delete it, you again need to select 'New Drawing' and load the image you were working on by clicking on it. Once you load it, look below the picture for the deletion option. See picture below.
Once you have saved and posted your finished picture, you might decide to go back and edit it again, to add or change something.
When you do so, your saving options will be a little different.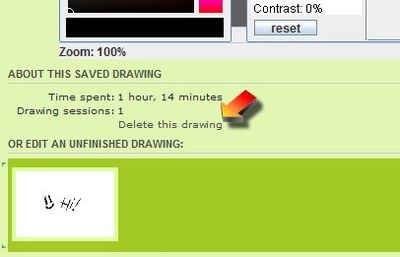
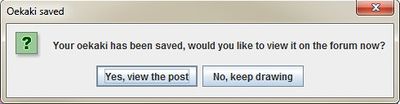
- Yes, view the post:
- Takes you back to your newly saved image and the thread it is on.
- No, keep drawing:
- Saves the updated picture to the oekaki, but does not post it yet. You will have to save and view the post (see previous) in order for everyone to see the changes you made.
Work in progress =} - #Line Style Box
- #Colour Palette
- #Colour Drop Box
- #Textures Menu
- #Brush Options
- #Canvas
- #Brush Options


